
| Hi and welcome back to Part 4 of my how to pages to creating a train gif scene. Let's do a run down of what we've covered so far. We've covered the <MARQUEE> tag, the direction, the speed, the <DIV> tag, placement of the backdrop and of a single train. What if you want to run double trains, one in each direction? What about that water tower? Well let's get what we already know from the last part. Here we go: |
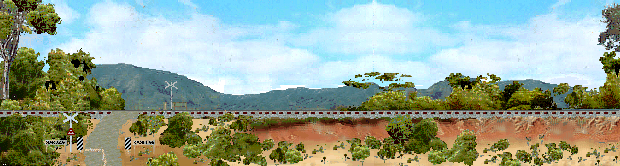
| There we go, this is what we finished in the last step. We have the background and we have a single train...and the HTML for that looks like this:
<DIV id="bkdrop" style="position:absolute; Z-index:0;; top:439; left:0"> <IMG SRC="http://background.gif" width="100%"> </div> <DIV id="Train1" style="position:absolute; Z-index:1;; top:400; left:0"> <MARQUEE DIRECTION="RIGHT" SCROLLDELAY="35" TRUESPEED> <IMG SRC="http://file name.gif"><IMG SRC="http://file name.gif"><IMG SRC="http://file name.gif"> </marquee> </div> Remember that your top:, left:, and "filename.gif" will all be different from what's here, the important thing to know is that your acual tags should go in this order. Another important note is that I took the liberty of naming the backdrop, "background.gif" but you can name it anything you would like just so long as the path where your images are is right Now, if you want to add something behind the train, you put another <DIV> and an <IMG SRC> tag to your existing HTML. Your HTML should look like this: (Yellow is existing HTML, pink is what is added) <DIV id="bkdrop" style="position:absolute; Z-index:0;; top:439; left:0"> <IMG SRC="http://background.gif" width="100%"> </div> <DIV id="watertower" style="position:absolute; Z-index:1;; top:239; left:230"> <IMG SRC="http://filename.gif"> </div> <DIV id="Train1" style="position:absolute; Z-index:1;; top:400; left:0"> <MARQUEE DIRECTION="RIGHT" SCROLLDELAY="35" TRUESPEED> <IMG SRC="http://file name.gif"><IMG SRC="http://file name.gif"><IMG SRC="http://file name.gif"> </marquee> </div> Click on Part 5 to see what this does now. By now you should have a good grasp of the main ideas behind scene making, and if not, just use the back button to get the information you could still need to look at more. |